Artificial grass carpet is an excellent choice for anyone looking to enjoy a lush, green lawn without the hassle of regular maintenance. Whether you’re covering a backyard, a balcony, or a commercial space, this comprehensive guide will walk you through each step of the installation process. With a little patience and the right tools, you can achieve a professional-looking result. Let’s get started!
Introduction
Artificial grass Dubai is becoming increasingly popular due to its low maintenance, aesthetic appeal, and durability. This guide will provide you with a detailed, step-by-step process to ensure your installation is smooth and successful.
Benefits of Installing Artificial Grass Carpet
Before diving into the installation process, it’s important to understand the advantages of artificial grass:
- Low Maintenance: No need for watering, mowing, or fertilizing.
- Cost-Effective: Saves money on water bills and lawn care products.
- Durability: Can withstand heavy foot traffic and extreme weather conditions.
- Year-Round Greenery: Provides a lush, green appearance throughout the year.
Tools and Materials Needed
To install artificial grass carpet, you will need the following tools and materials:
- Artificial grass rolls
- Turf adhesive or nails
- Utility knife
- Measuring tape
- Broom or stiff brush
- Sand infill (optional but recommended)
- Garden hose
- Shovel
- Weed barrier fabric
- Compactor (hand tamper or plate compactor)
- Screws and washers (for securing edges)
Preparing the Installation Area
- Clear the Area: Remove any existing grass, plants, rocks, and debris from the installation site. Use a shovel to dig out the area to a depth of about 2-3 inches.
- Level the Ground: Ensure the surface is even by filling in low spots and removing high spots. A level surface is crucial for a smooth installation.
- Install Weed Barrier Fabric: Lay down a weed barrier fabric to prevent weed growth. This step is essential for long-term maintenance.
Measuring and Cutting the Artificial Grass
- Measure the Area: Use a measuring tape to determine the dimensions of the installation area. Make sure to measure accurately to avoid wastage.
- Cut the Grass: Unroll the artificial grass on a flat surface. Use a utility knife to cut it to the required size, leaving an extra inch on all sides for adjustments.
Installing the Base Layer
- Add Base Material: Spread a layer of crushed rock or gravel (3-4 inches) over the installation area. This base layer provides stability and drainage.
- Compact the Base: Use a hand tamper or plate compactor to press down the base material, ensuring a firm and level surface. This step is critical for preventing the grass from shifting.
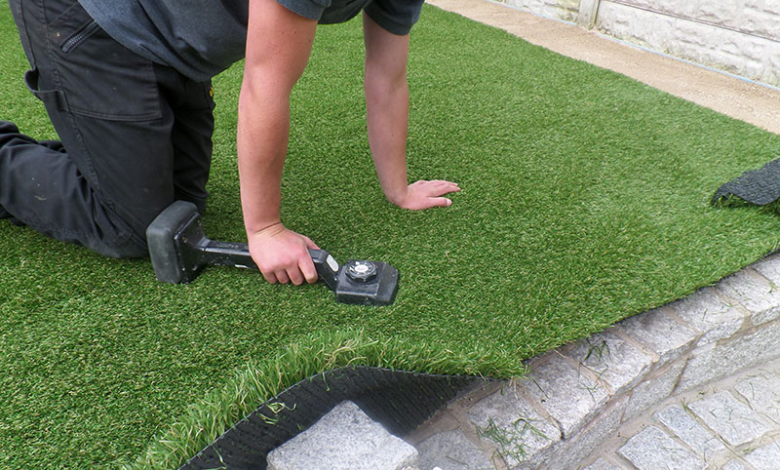
Laying and Securing the Artificial Grass
- Position the Grass: Unroll the artificial grass over the prepared base. Make sure the grass fibers are all facing the same direction for a natural look.
- Adjust the Placement: Carefully adjust the position of the grass to cover the entire area. Trim any excess grass along the edges using a utility knife.
- Secure the Grass: Apply turf adhesive or use nails to secure the grass to the ground. Place nails around the perimeter and along the seams, spacing them about 6-8 inches apart. For a more secure fit, use screws and washers along the edges.
Applying Sand Infill
- Spread the Sand: Apply a layer of sand infill evenly across the surface of the artificial grass. The sand helps keep the grass fibers upright and provides additional stability.
- Brush the Grass: Use a broom or stiff brush to work the sand into the grass fibers. This step ensures that the sand is evenly distributed and helps the grass maintain its upright position.
Final Touches and Maintenance Tips
- Water the Grass: Lightly water the grass to help settle the sand infill. This step also helps the grass look more natural.
- Brush Regularly: Periodically brush the grass to remove debris and keep the fibers upright. This maintenance step is essential for preserving the appearance of the grass.
- Inspect and Repair: Regularly check for any loose edges or seams and make necessary repairs promptly. Keeping up with minor maintenance will ensure the longevity of your artificial grass carpet.
Conclusion
Installing artificial grass carpet is a straightforward process that can transform any outdoor space into a beautiful, low-maintenance oasis. By following this complete guide, you can achieve professional results and enjoy the many benefits of artificial grass for years to come. With the right tools, materials, and a bit of effort, you can have a stunning, green lawn all year round without the usual upkeep. Happy landscaping!
FAQs
- How long does artificial grass last?
Artificial grass typically lasts between 10 to 20 years, depending on the quality of the material and the level of maintenance. High-quality artificial grass with proper installation and care can even exceed 20 years of lifespan.
- Is artificial grass safe for pets and children?
Yes, artificial grass is safe for both pets and children. It is made from non-toxic materials and provides a clean, soft surface for play. Additionally, it eliminates the need for pesticides and fertilizers, making it a safer option compared to natural grass.
- How do I clean and maintain artificial grass?
Cleaning artificial grass is simple and requires minimal effort. Regularly brush the grass to remove debris and keep the fibers upright. Rinse with water to remove dirt and pet waste. For stubborn stains, a mild detergent and water solution can be used. Routine maintenance will help keep your artificial grass looking fresh and vibrant.
- Can I install artificial grass on any surface?
Artificial grass can be installed on a variety of surfaces, including soil, concrete, wood, and even rooftops. The key is to ensure proper preparation of the base layer for drainage and stability. For non-soil surfaces, additional steps such as adding a drainage layer may be required to ensure optimal performance.